DIGITAL COLORING IN PHOTOSHOP
Article by Irene Laschi
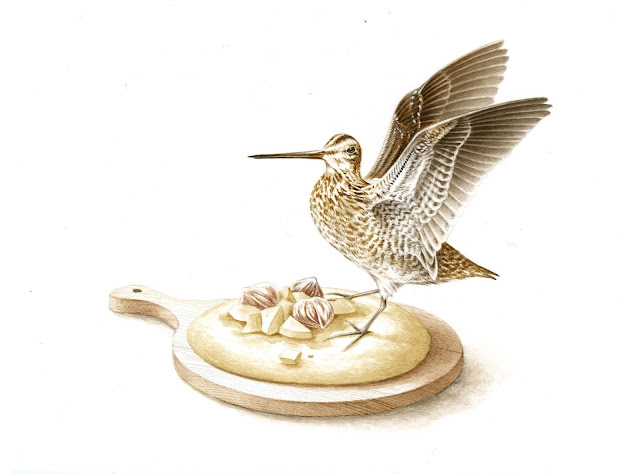
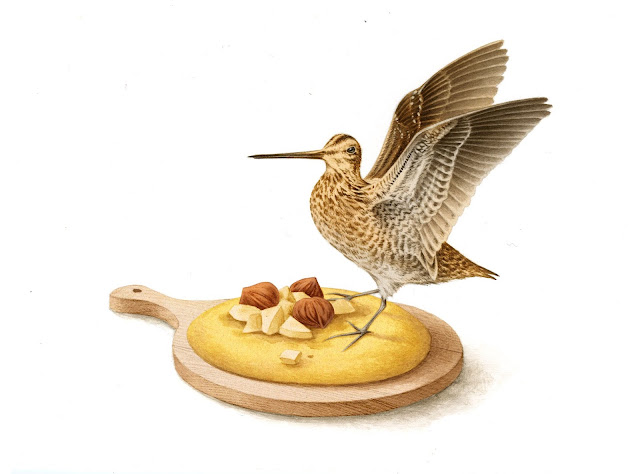
How could a chiaroscuro drawing made on paper be colored in Photoshop?
I asked myself this question when I started drawing illustrations as a professional illustrator, more than 10 years ago.
I was used to draw both colored and black and white drawings with traditional media on paper, but I wanted to learn different solutions, using digital media too.
Rather than starting with digital paintings I tested a mixed media: handmade drawing on paper + digital coloring.
I drew these illustrations for Citizen K magazine some years ago, and they are a good example of this mixed media.
The following tutorial is the method I used in this specific case, and I consider it my standard one.
It's really easy, but of course it's not the only possible one.
If you want to try, you just need a good monochromatic drawing, a scanner, Adobe Photoshop (even old versions are ok, I used CS3 for ages and now I'm using CS6) and a graphic tablet (a Wacom Bamboo would be enough!)
STEP 1
Make a good scanning of the handmade monochromatic drawing (it should be at least 300dpi).
Make sure you don't lose too many details and shades in the scanning process.
It could be a pencil or a watercolor drawing, no matter if it's grey or slightly colored - you'll choose its final color in the following step.
If you scan it as a greyscale, you should change it's method in Photoshop (RGB or CMYK - it depends if it should be seen on screen or printed).
Unlock and transform this background layer in a layer in multiply blend mode, and bring it on top.
Create a new white background layer.
STEP 2
Add color layers above the drawing one, in color blend mode.
You can add as many colors you want - just keep different colors on different layers.
Add color layers above the drawing one, in color blend mode.
You can add as many colors you want - just keep different colors on different layers.
Create clipping masks to color only the drawing layer, and not what you're going to add between the drawing and the background.
Change their opacity to have more brilliant or desaturated colors.
Change their opacity to have more brilliant or desaturated colors.
STEP 3
Add a flat tone layer between the drawing layer and the background.
Add a flat tone layer between the drawing layer and the background.
It could be a flat layer or a slightly textured one - it depends on what you like most!
STEP 4
Create some layers with flat colors, above the previous one.
Like in STEP 3, add different colors on different layers.
Create some layers with flat colors, above the previous one.
Like in STEP 3, add different colors on different layers.
Putting each color on a different layer allows you to play with their transparency - for example, if you have a layer, normal blend mode, 70% transparency or less, you'll see part of the background color and you'll have a softer effect.
Choose for each color the suitable blending mode: I usually use normal, multiply or color mode, it depends on tones and colors (just browse different modes and choose the best one).
Choose for each color the suitable blending mode: I usually use normal, multiply or color mode, it depends on tones and colors (just browse different modes and choose the best one).
STEP 5
Add general shadows on a different layer, over the flat colors' ones, in multiply mode.
Add general shadows on a different layer, over the flat colors' ones, in multiply mode.
Use a soft brush to have a natural effect, or a big pencil one (as I did for casted shadows).
I used only one color, brown, to have uniformity.
STEP 6
Create a layer on top, normal or intense light mode, and add lights.
Create a layer on top, normal or intense light mode, and add lights.
Use a very thin and not too regular Photoshop brush - there are a lot of custom brushes you can choose from, it depends on the final effect you want to have.
If you use the custom soft brush, don't use it with a big tip (10px or more): light would be too soft and regular, and the final effect would be a fake one.
If you use the custom soft brush, don't use it with a big tip (10px or more): light would be too soft and regular, and the final effect would be a fake one.
In this case, I used a pencil brush, and I added only white.
You shoudn't add too many lights - only on some focus points to give life to the drawing.
Hope it was useful!
Feel free to ask if you have any question or if anything wasn't clear enough.
If you want, leave a comment or a feedback, ask if you have any question or let me know what you would like to read in the next posts! Thank you!


Comments
Post a Comment